Using CMake for the ESP32 with the Eclipse C/C++ IDE
The Photon release of the Eclipse C/C++ IDE now includes support for a number of different build systems. CMake is one of the most popular build systems with open source projects so it was an obvious candidate. The Eclipse CDT project has been working on CMake support for a few years and now it’s ready for wider adoption.
One of the open source projects using CMake is the Espressif IoT Development Framework, ESP-IDF, an SDK for their inexpensive and highly featured system on a chip, the ESP32. It is widely popular with hobbyists with boards available from a number of vendors. Though CMake support is currently in a feature branch, it is expected their CMake build files will make it to the master branch in the upcoming months.
This environment is a great example of how the new features in the Eclipse C/C++ IDE automate much of the build and launch process to speed up development on microcontroller projects. We will walk though each of the steps to build an application and get it running on a board and will highlight the new features in Eclipse Photon as we go.
Environment
Espressif provides thorough documentation on how to set up your development environment. Here’s a quick highlights of what I did for mine. I’m using Windows 10 with CMake, Ninja, and Python 2.7 provided by scoop. No MSYS or Cygwin. I use busybox for my shell but Eclipse doesn’t need it.
- Follow the Setup Windows Toolchain from Scratch instructions to get the xtensa toolchain and mconf Kconfig utility. Add them to your PATH environment variable.
- Checkout the features/cmake branch of the ESP-IDF. Make sure you do a recursive checkout to pick up it’s numerous git submodules. Set the IDF_PATH environment variable to the root location of the repo.
- Install the pyserial Python library for esptool.
Now we’re ready to fire up Eclipse.
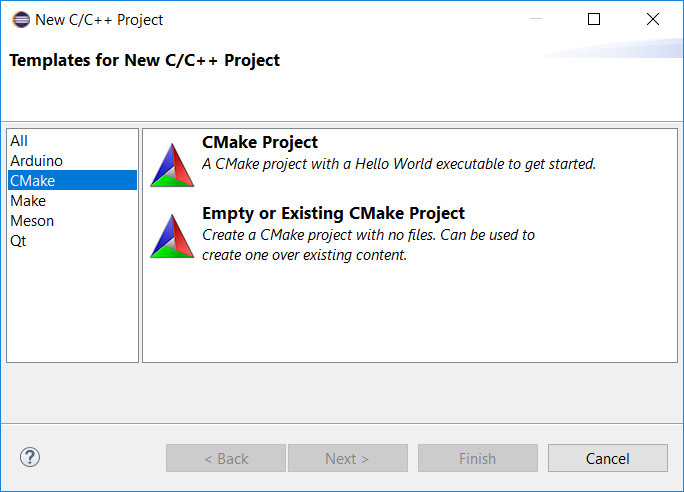
CMake Project
In the New C/C++ Project wizard select “Empty or Existing CMake Project” from the list of templates and create a new project. This will create the project but without a CMakeLists.txt or any source files.
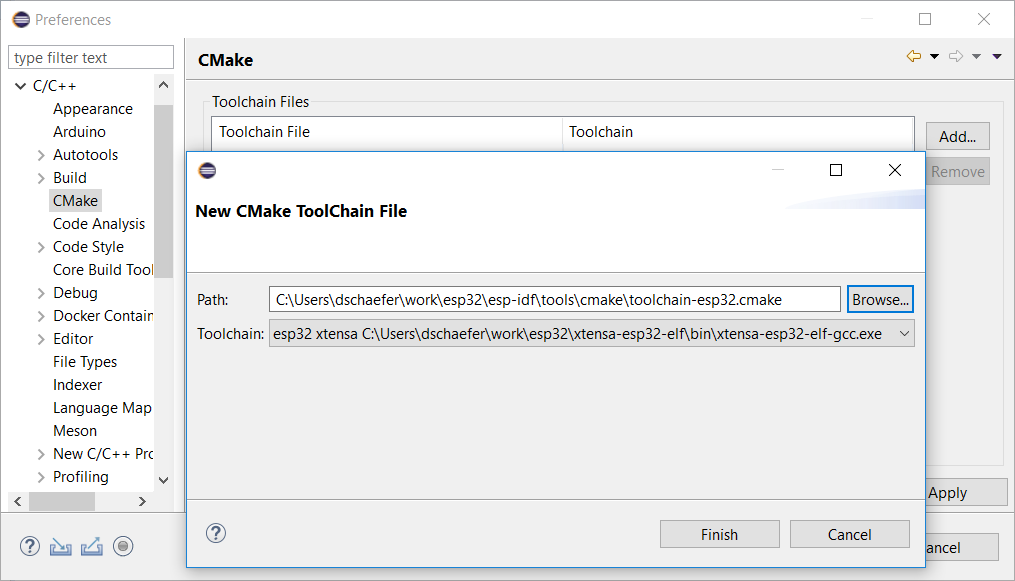
The Toolchain
We now need to tell CDT which toolchain to use when building the project. This will pass the required arguments to CMake when generating the Ninja files.
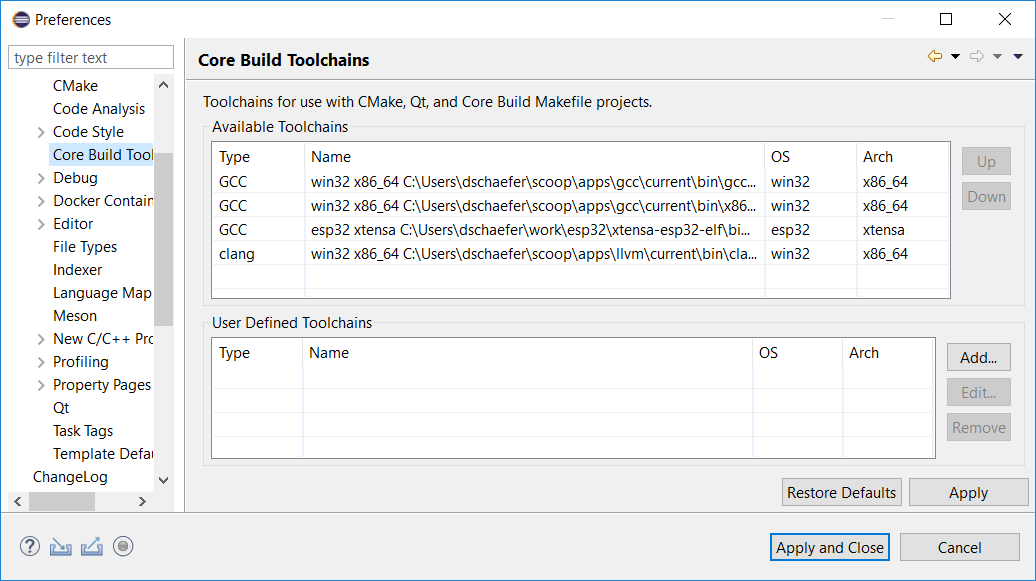
In the Preferences, select C/C++ and then CMake to see the list of toolchain files CDT will use with CMake. Click Add. Each CMake toolchain file is associated with a toolchain. Since we have the xtensa toolchain in our PATH, CDT will auto discover it and it will appear in the dropdown. Also enter the location of the esp-idf toolchain file which is in the esp-idf repo under tools/cmake/toolchain-esp32.cmake.
The Launch Target
Next we need to tell CDT to use the toolchain for our project. This is accomplished through the Launch Bar, the new widget set you see on the far left of the toolbar.
Click on the third dropdown and select New Launch Target. We need to tell CDT about the target where we’d like to launch our application. We’ll be using the flash loader so select Serial Flash Target. Enter a name for the target, “esp32” as the operating system, “xtensa” as the CPU architecture, and select the serial port your ESP32 device is connected to on your machine.
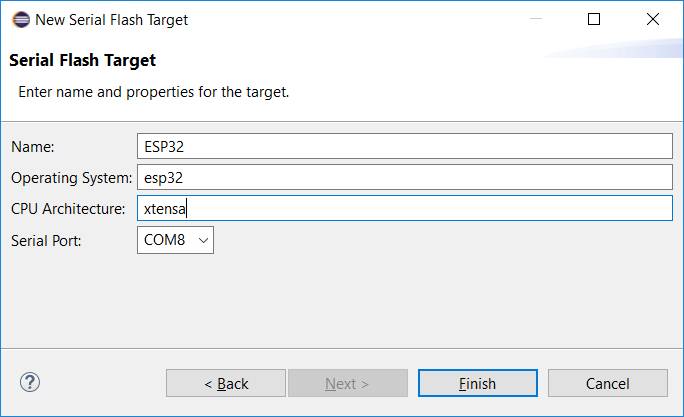
The OS and architecture need to match the settings for the toolchain. You can see those settings in the Preferences by selecting C/C++ and Core Build Toolchains. For GCC toolchains, CDT autodetects those settings by asking GCC for it’s target triple.
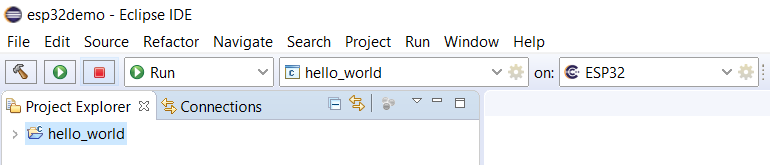
Build
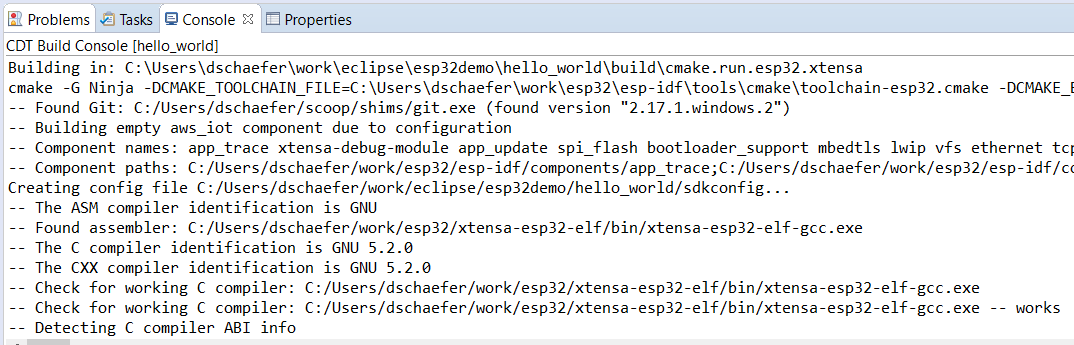
For this first project, we’ll use the Hello World example from the ESP-IDF. It is found in the examples/get-started/hello_world. Copy the contents of this directory into your project. Since we’re using CMake you can delete the Makefile and the main/component.mk files to prove you’re using CMake.
Notice that the Launch Bar shows Run Hello World on ESP32. When you click the Build button, it will run a build of that project for the ESP32 Launch Target in Run mode, the only one available for the ESP32 for now, and will make sure the right toolchain and CMake toolchain file are used in the build.
Terminal
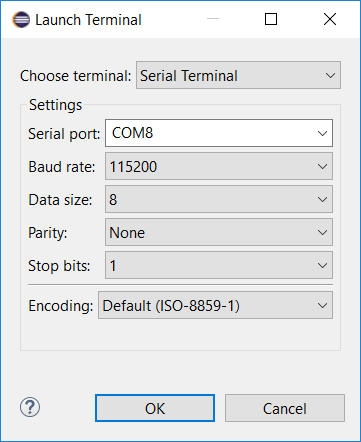
To see what our program does, we need to see the output from the serial port. I have an Adafruit Huzzah32 which uses USB to both power the board while in development and to talk over the serial port. We’ll use the Eclipse Terminal to connect to that serial port. Click the Terminal toolbar button and select Serial Terminal as the terminal type and complete the rest of the settings.
Launch
To get the app running on the board, we need to download it over the USB serial port and burn it into the flash memory on the device. The ESP-IDF has a tool for that called esptool. The IDF also has a nice wrapper script that manages flashing as well as a number of other handy operations.
To hook it up, we need to set up the launch configuration. This is where the Launch Bar shines. Click on the gear next to your project in the middle selector. It will open a launch configuration edit dialog. Since our target type is Serial Launch Target, it has a simple launch that executes an external tool. We’ll set it up to run python with the idf.py script and set the build directory and serial port and ask it to flash.
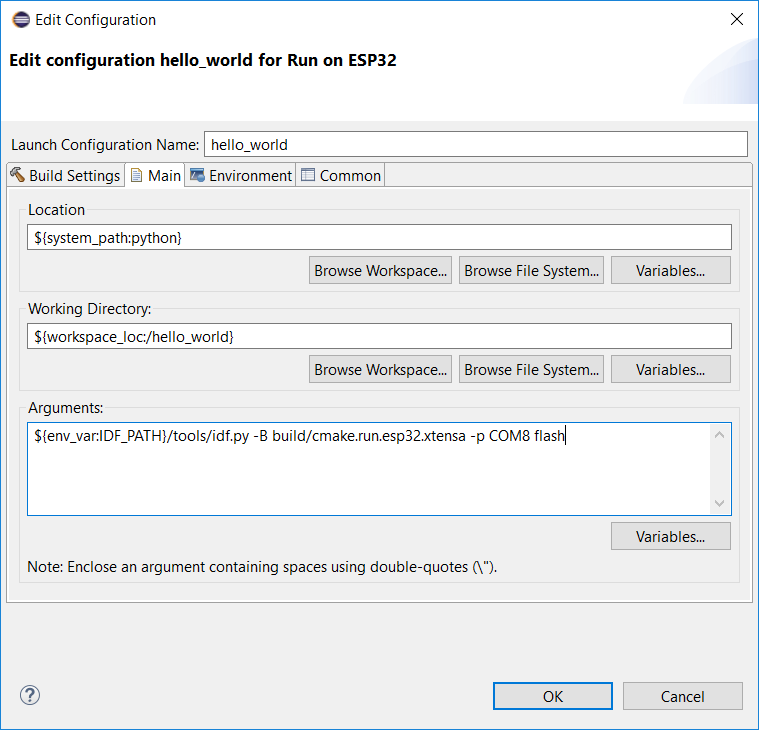
If you had a program running on your chip you’ll notice in the Terminal that it stopped printing there. The CDT has noticed that your launch target and the terminal are using the same serial port and pauses the terminal while the python script runs. This is especially important on Windows since only one program may control the serial port at a time. Once it starts up again, you see the output of your program. This makes it very easy to iterate changes.
Conclusion
The Eclipse Photon release of the C/C++ IDE is the culmination of a number of years of work on the Launch Bar and CDT’s new Core Build system that gives us CMake and makes it easy to integrate other build and launch tools. Bringing these tools together and having them work together to accellerate development is what Integrated Development Environments are all about.